
A Website Experience
There are multiple factors and rationalizations as to why those sites are the way they are, but that is not the purpose of this article. The intent behind this post is to educate how we, as users, can take matters into our own hands and create an enjoyable website environment to peruse through. The situation does not bode well when users are bombarded by popup ads, chat/messaging bots, and “Accept These Cookies” notifications.
Which brings us to the heart of the article: User JavaScript and CSS, so let’s get started.
Table of Contents
About
User JavaScript and CSS is a nifty browser extension that lets you manipulate the CSS and JavaScript on any site to better improve the world wide web experience per site. Conceal popups and advertisements, hide banners, increase font sizes, silence comment threads, and even apply animation how you see fit.
Installation
Go ahead and install User JavaScript and CSS by tenRabbits from the Chrome Web Store.
The extension will appear at the top right-hand corner of your browser as soon as the extension has finished going through the installation process. If not, click on the puzzle-piece icon to reveal the list of extensions added to your browser, followed by clicking on the pin icon to set a visible location within the top right-hand corner of the browser.
A Brief CSS Lesson
In order to apply any CSS rule towards the sites we are viewing, we need to know either the tag, class, and/or id of the item we are going to alter. A tag is text represented within angle brackets, e.g. <h1>, <img>, <div>, while the class and id attribute is represented with quotation declarations, e.g. class=”mario” or id=”luigi”.
Class names can be used multiple times throughout the document whereas id names are used once and meant for unique cases. This is because if you have multiple recurring items that require the same style, say a bold effect, all you would have to do is apply the class name to whichever element you want the bold effect to take place on. For example, if you want all the first and last names of a dodgeball tournament to be bold and underline, you would apply a class to all first and last names.
If you wanted the winner to stand out, sure, you can apply a class towards the winner, but best practices would be to apply an id instead as there is a single, unique, winner. The key difference to how classes and ids are written and interpreted within a CSS file is represented by either a dot, “.”, for classes or a pound or hashtag symbol, “#”, for ids. Pay very close attention as id=”mario” and class=”luigi” have entirely different declarative meanings than class=”mario” and id=”luigi”. Within a CSS file, class=”mario” would be written as .mario and id=”luigi” would be written as #luigi.
This method dictates what is classified as a class and id within a HTML document, and is integral to keep in mind when targeting a class or id within DevTools for alterations:
classes = you can have multiple instances throughout the page
ids = you can have only one instance throughout the page
To get some repetitive CSS practice, check out how to create an 8-bit character using CSS.
Inspect Element
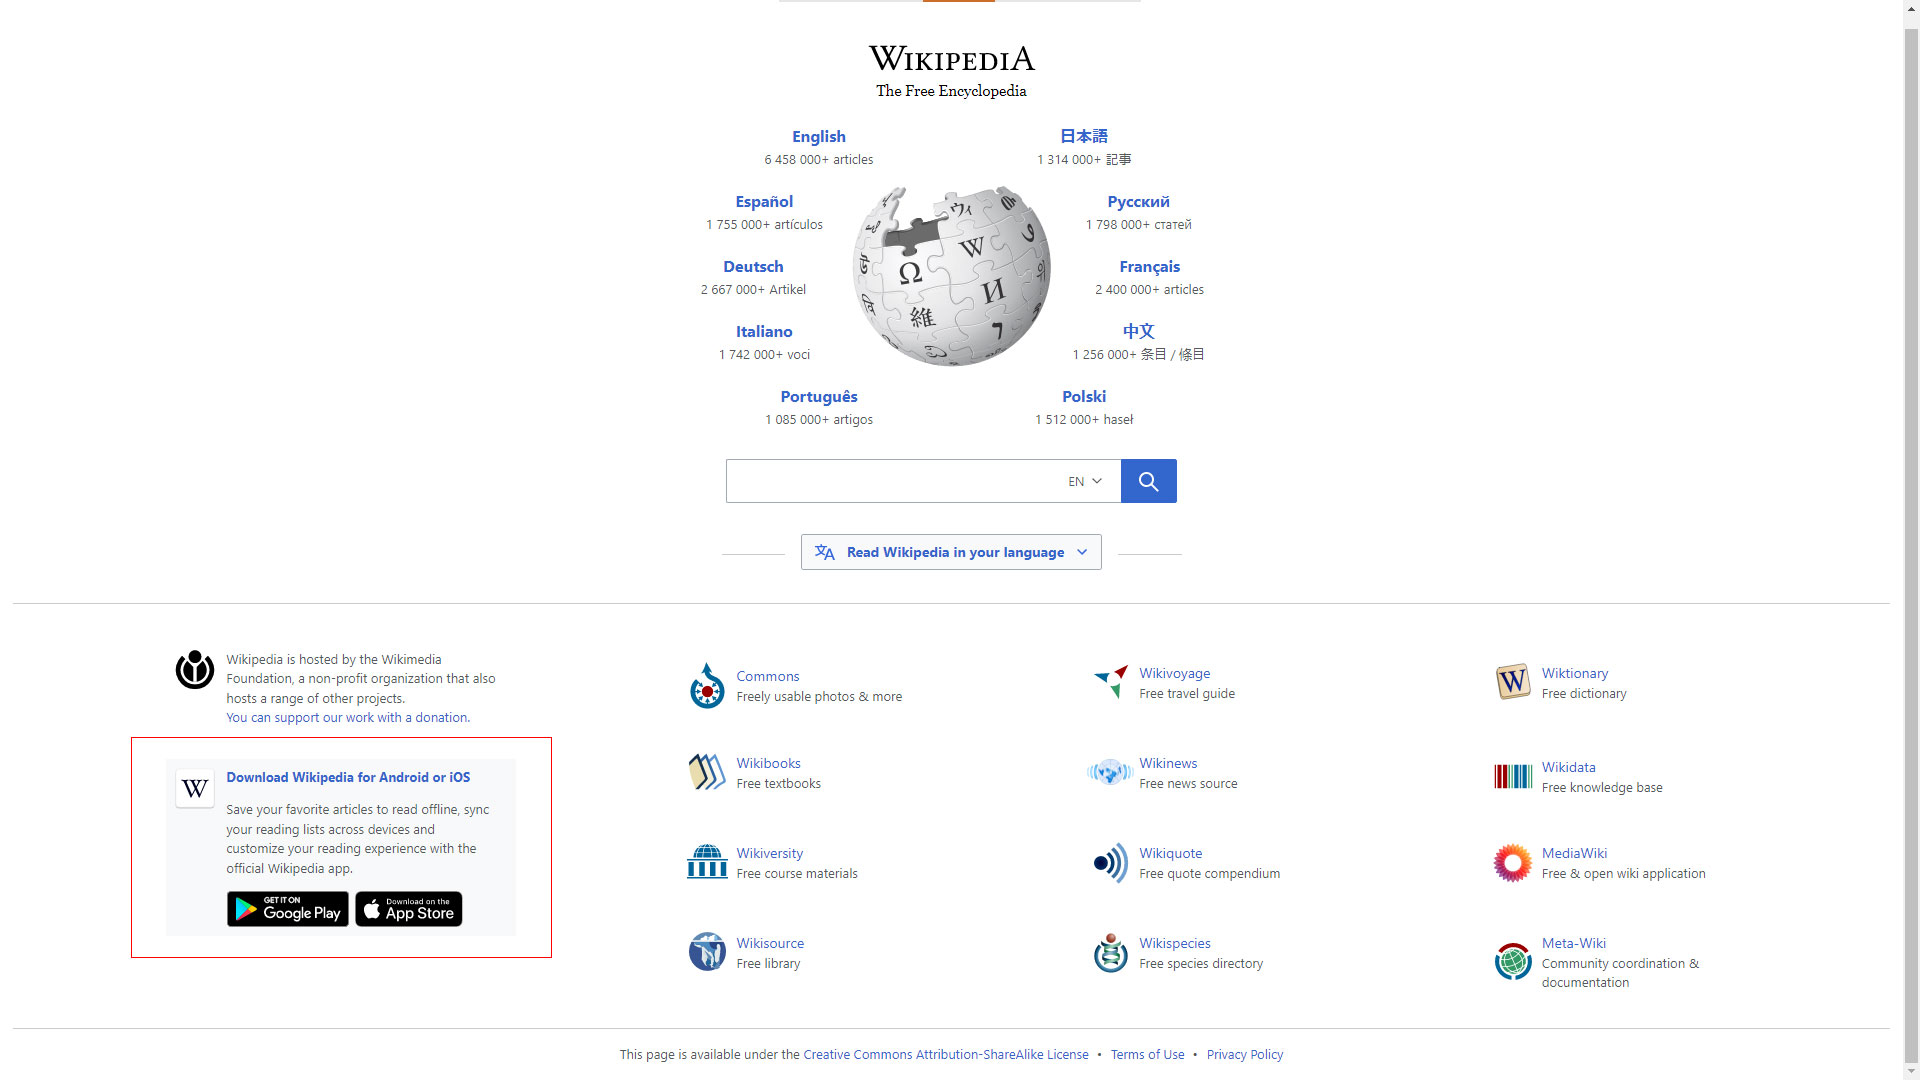
Moving forward, visit any site and inspect element on the content you wish to alter. If you’re not sure what inspect element is – let alone how to use it – read up on the inspect element blog to get more details on the browser feature and practice using it. I will be using Wikipedia as a guinea pig for this blog. Feel free to practice on whatever website as you follow along.
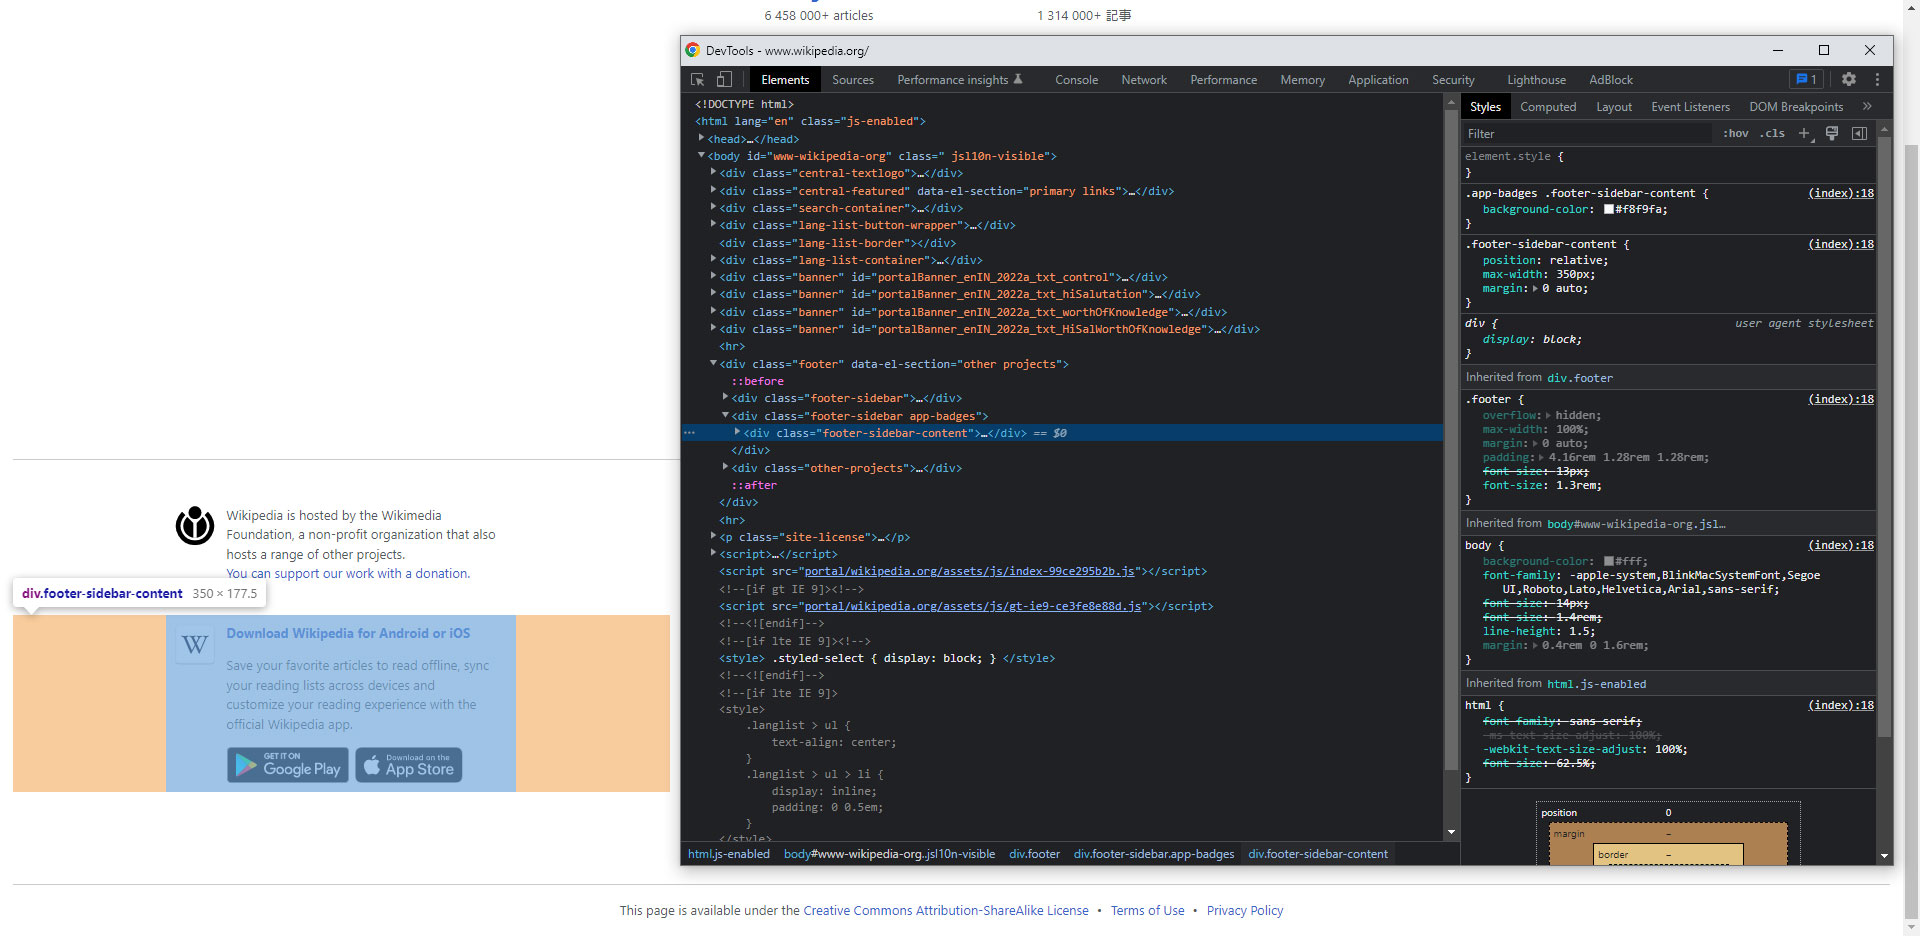
Let’s say I would like to omit the red-boxed area whenever I stumble upon the site. I do not wish to see the promotion of the Wikipedia app every time I am on the Wikipedia home page.
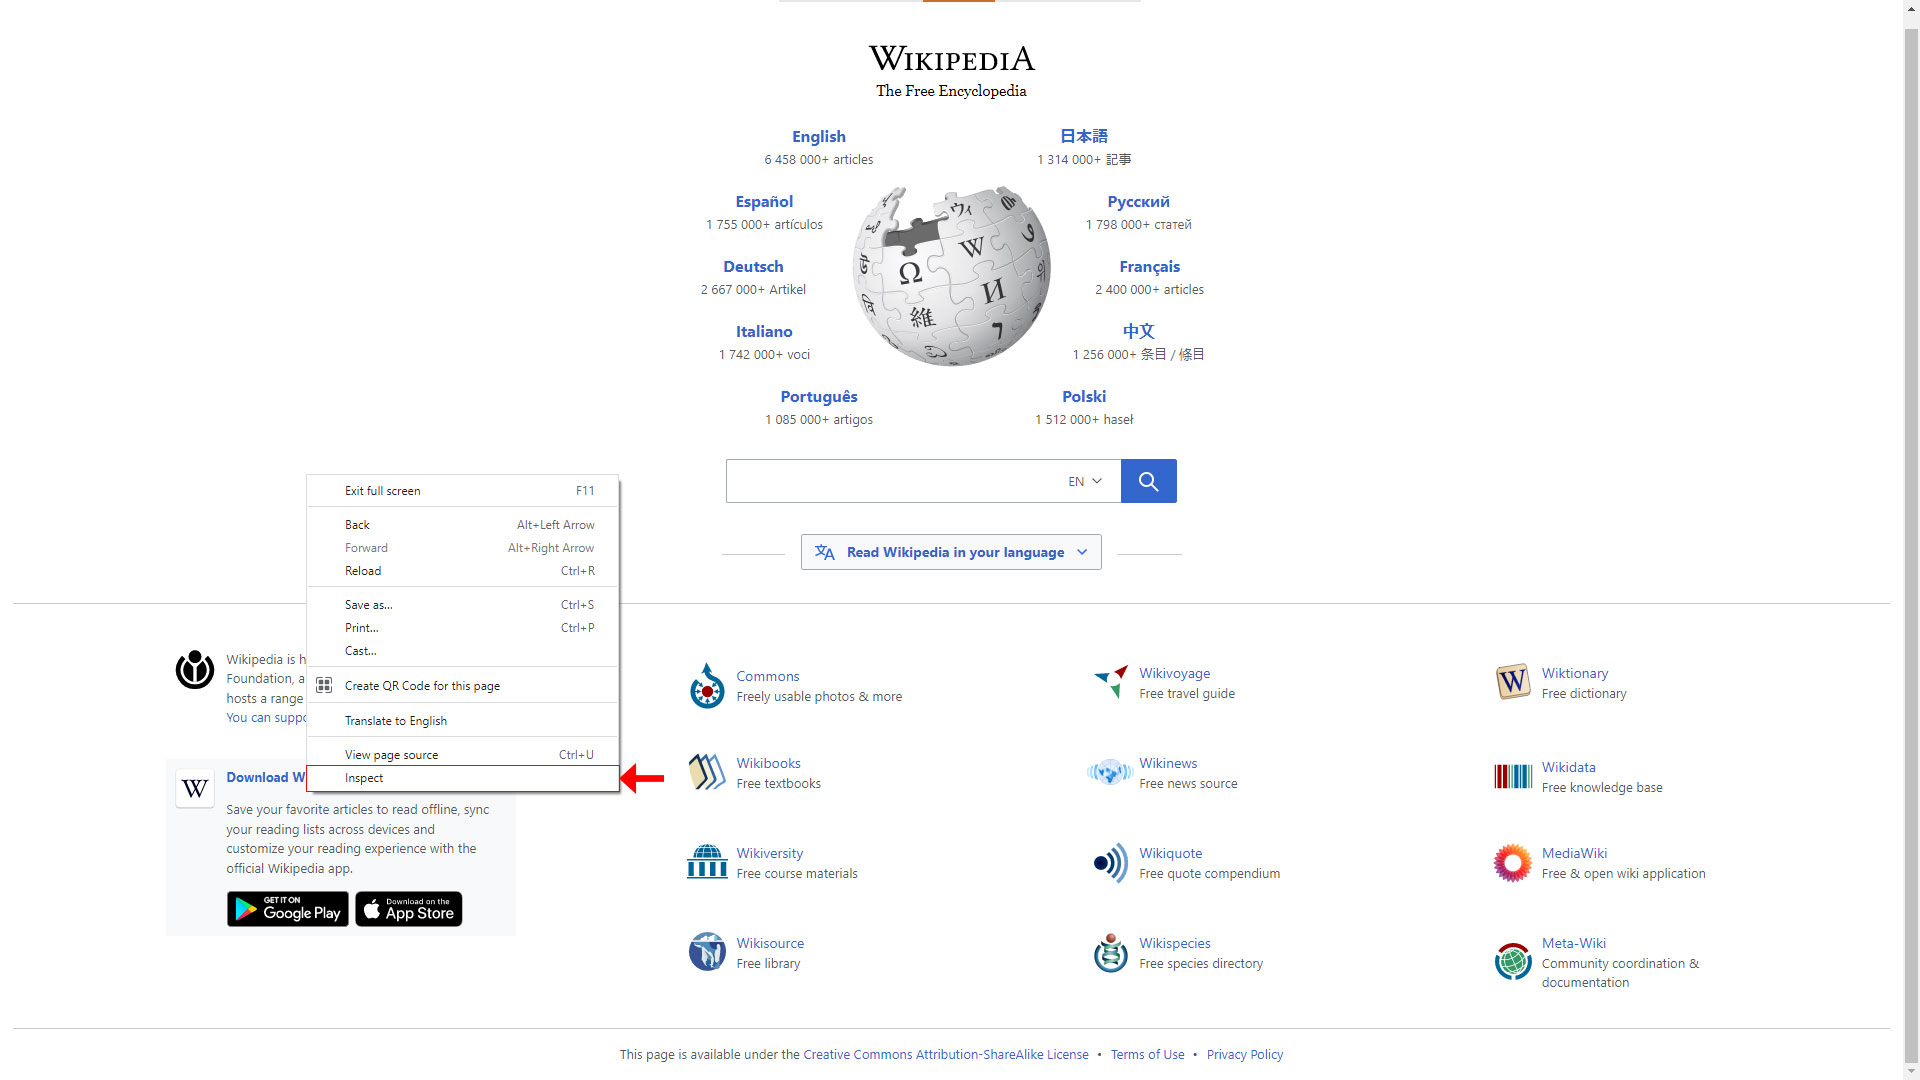
Right-click within the promotion-box area and select the Inspect option within the menu.
A new window, DevTools, should appear before you. To change the default position of how the DevTools window shows up, click on the vertical ellipses ( three dots ) and select the first Dock side option. This option will have your DevTools window pop up as a secondary window.
Hover over each of the four options for a split second to have the description label pop up to describe the purpose behind each of the four Dock side options. I prefer my DevTools window to be a separate window, but to each their own.
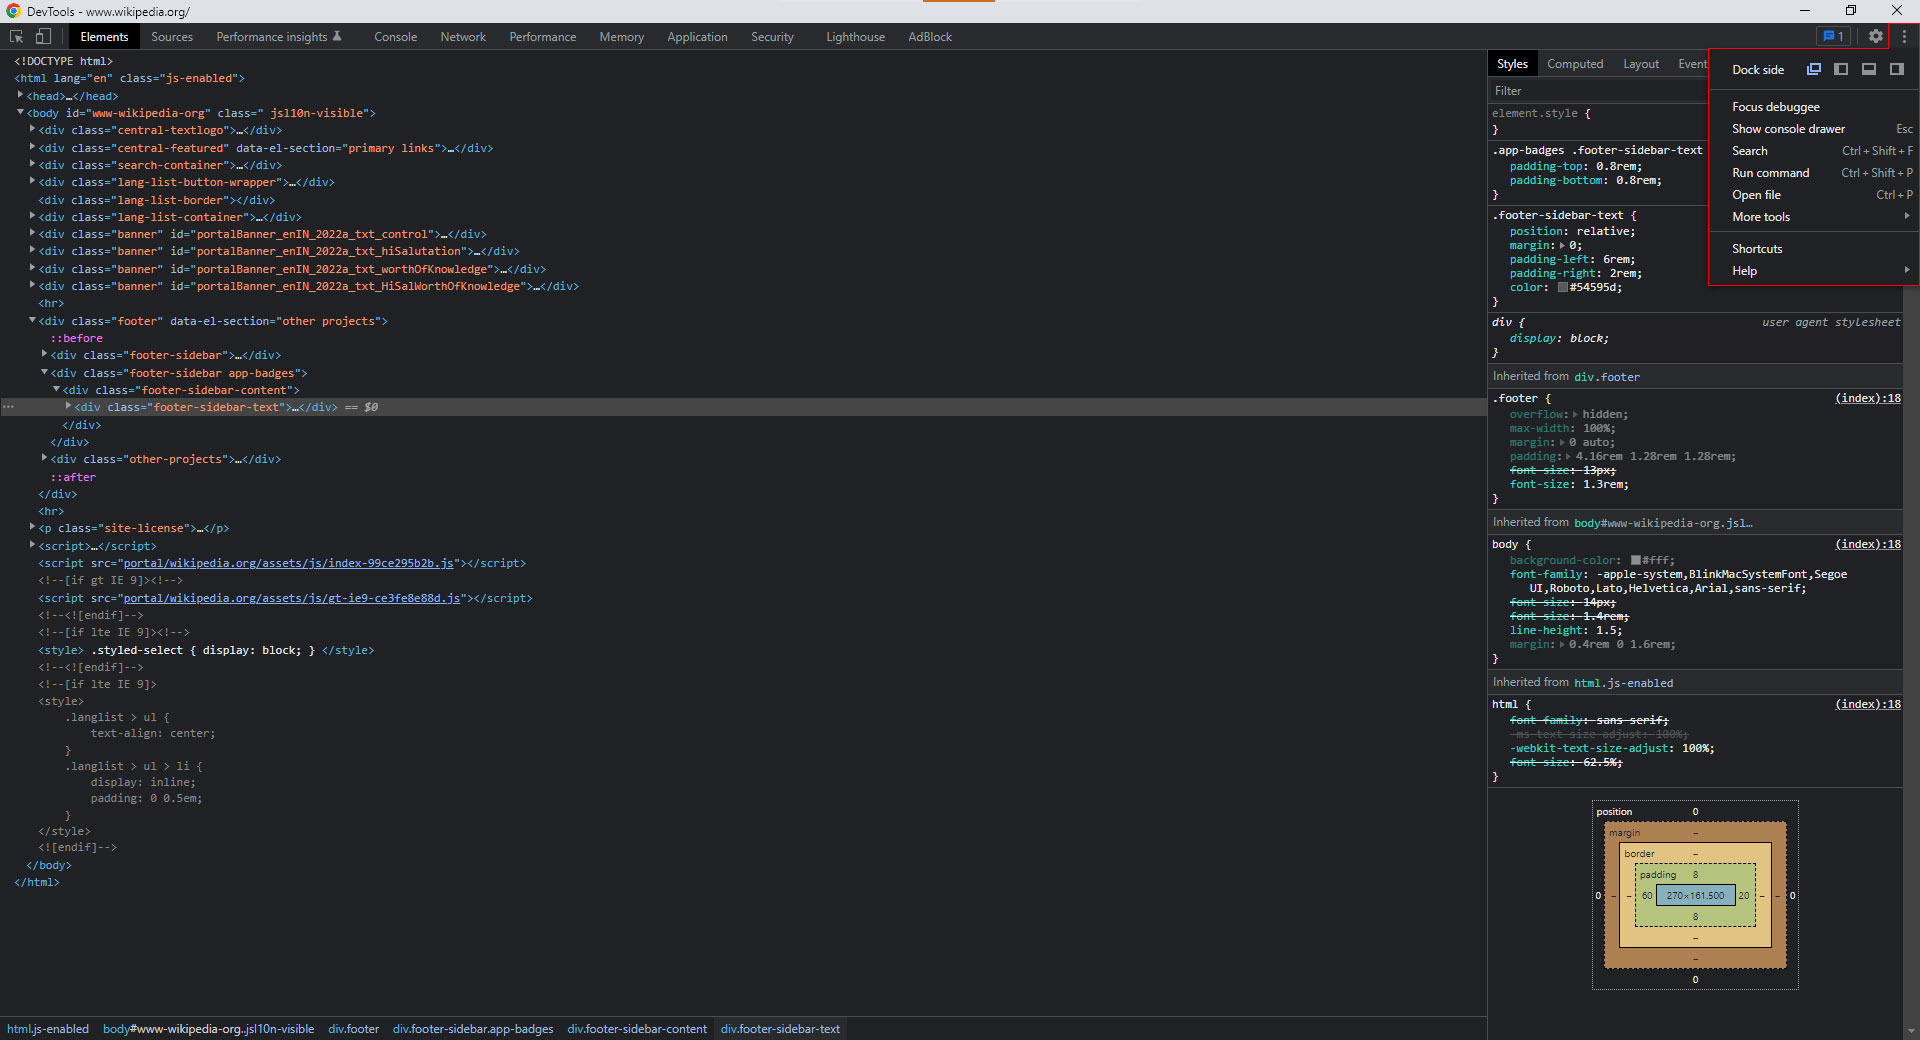
You’ll notice as you hover over various HTML elements within DevTools which items on the page correspond to the highlighted elements within DevTools.
Traverse upwards within DevTools using your mouse or arrow keys until you reach the final parent container of the promotion element. In my case, the final parent container appears to be footer-sidebar app-badges.
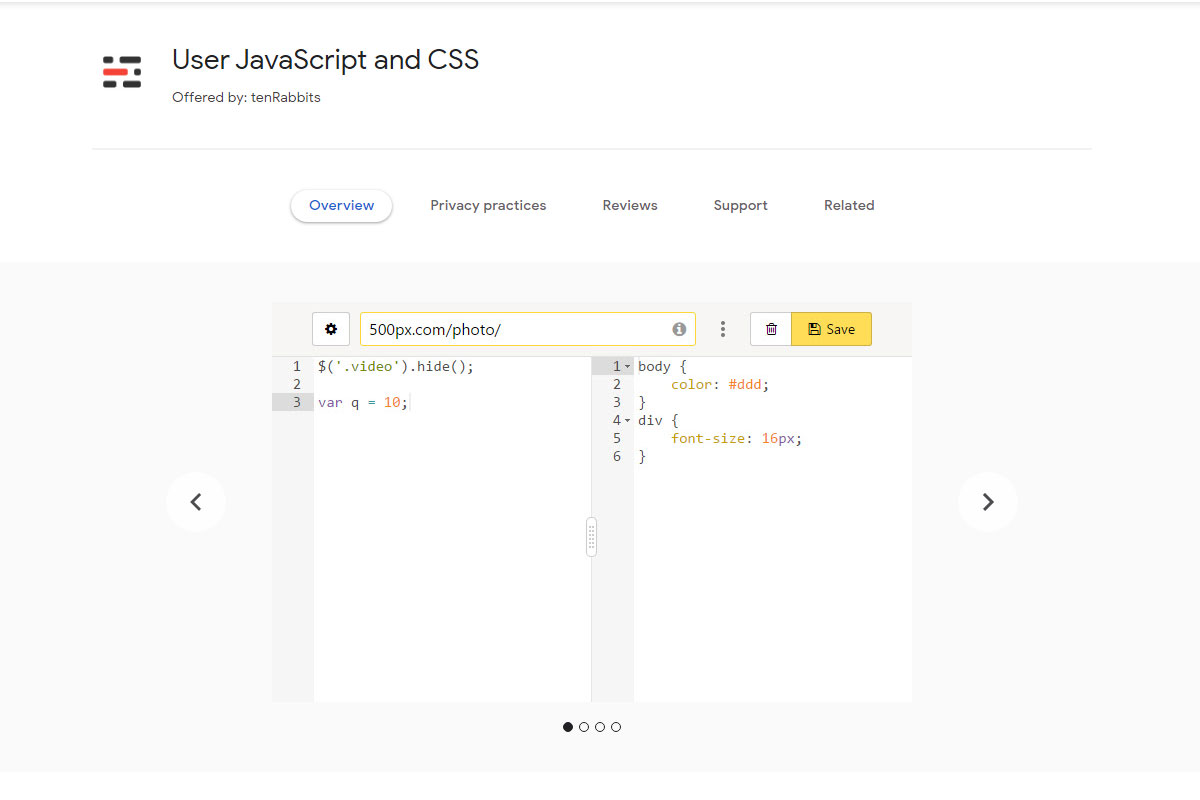
Click on the User JavaScript and CSS icon in the top-right corner where the pinned extensions are shown, and then click on the + Add New button.
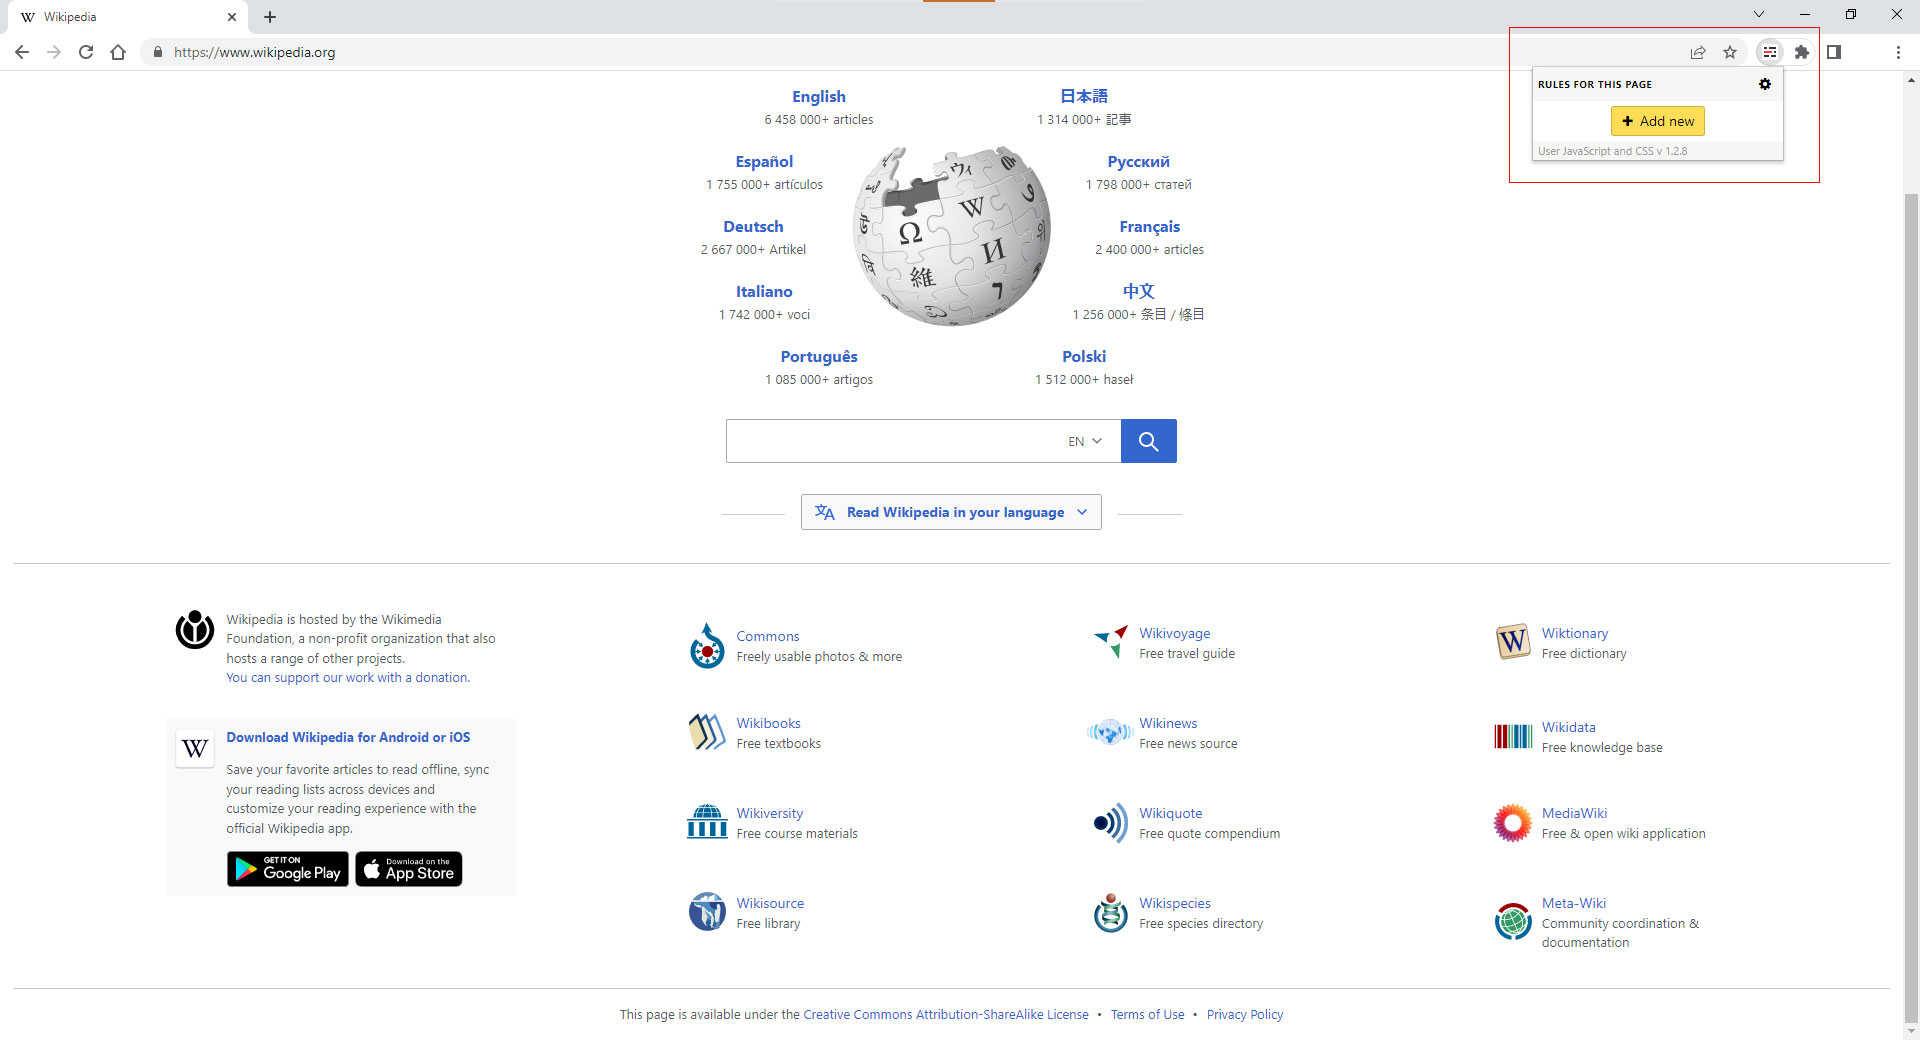
You should be on a new tab displaying two blank canvases: JavaScript on the left, CSS on the right.

Adjust CSS
If custom rules were added to solely footer-sidebar, each instance of footer-sidebar would be affected and we do not want that outcome. To eliminate any vagueness, app-badges is appended to footer-sidebar.
Recall that classes are represented by dots, “.”, so our class declaration will look like this: .footer-sidebar.app-badges. If there was a tertiary class included in the element, e.g. .banner-fold, the result would instead be .footer-sidebar.app-badges.banner-fold. The more classes you define in your CSS, the more specific the rule.
Class order does not matter, so .footer-sidebar.app-badges.banner-fold is the same as .app-badges.footer-sidebar.banner-fold or .banner-fold.footer-sidebar.app-badges.
What if there was only one class for an element you are trying to target? Well, you can include the tag alongside the declaration, e.g. h1.footer-sidebar or div#luigi. Or you can approach this from a hierarchy perspective by adding spaces in between each declaration, e.g. .footer-sidebar .app-badges. This protocol informs us the latter class is a child of the former class.
You can be as specific as you like, e.g. .footer-sidebar #luigi #mario .app-badges or you can be as vague as you want, e.g. .footer-sidebar .app-badges. As long as the CSS declarations are parallel to the HTML hierarchy, your styles should apply with no problem.
User JavaScript and CSS
Type in .footer-sidebar.app-badges into the CSS side followed by a left and right curly bracket.
Note: If you first type the left-curly bracket followed by hitting the enter/return key, the right-curly bracket will generate itself, and the cursor will be auto-indented and positioned on a new line for the incoming CSS rule(s) automatically.
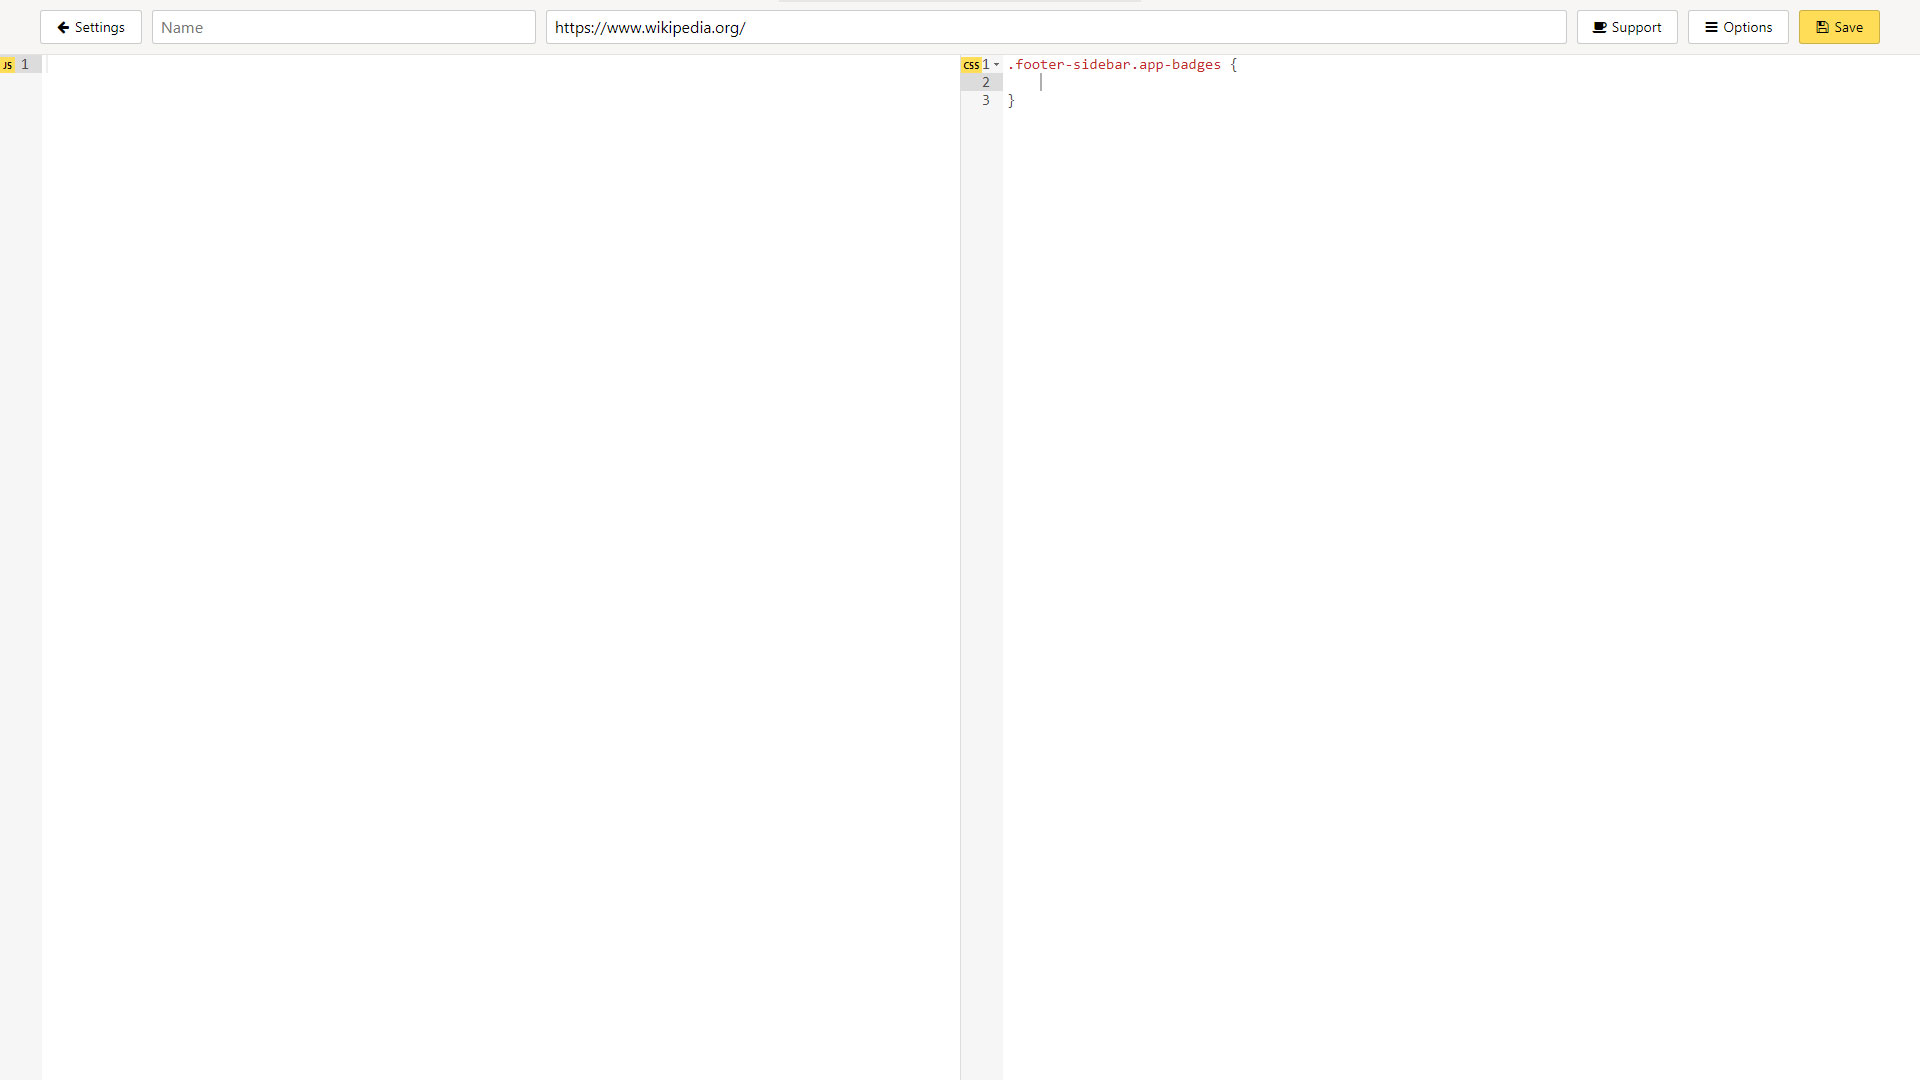
Inside the .footer-sidebar.app-badges declaration, type display: none;.
This style is what gets applied to the declaration above which alters the content on the webpage.
We are effectively saying, “Do not display content applicable to this defined ruleset.”

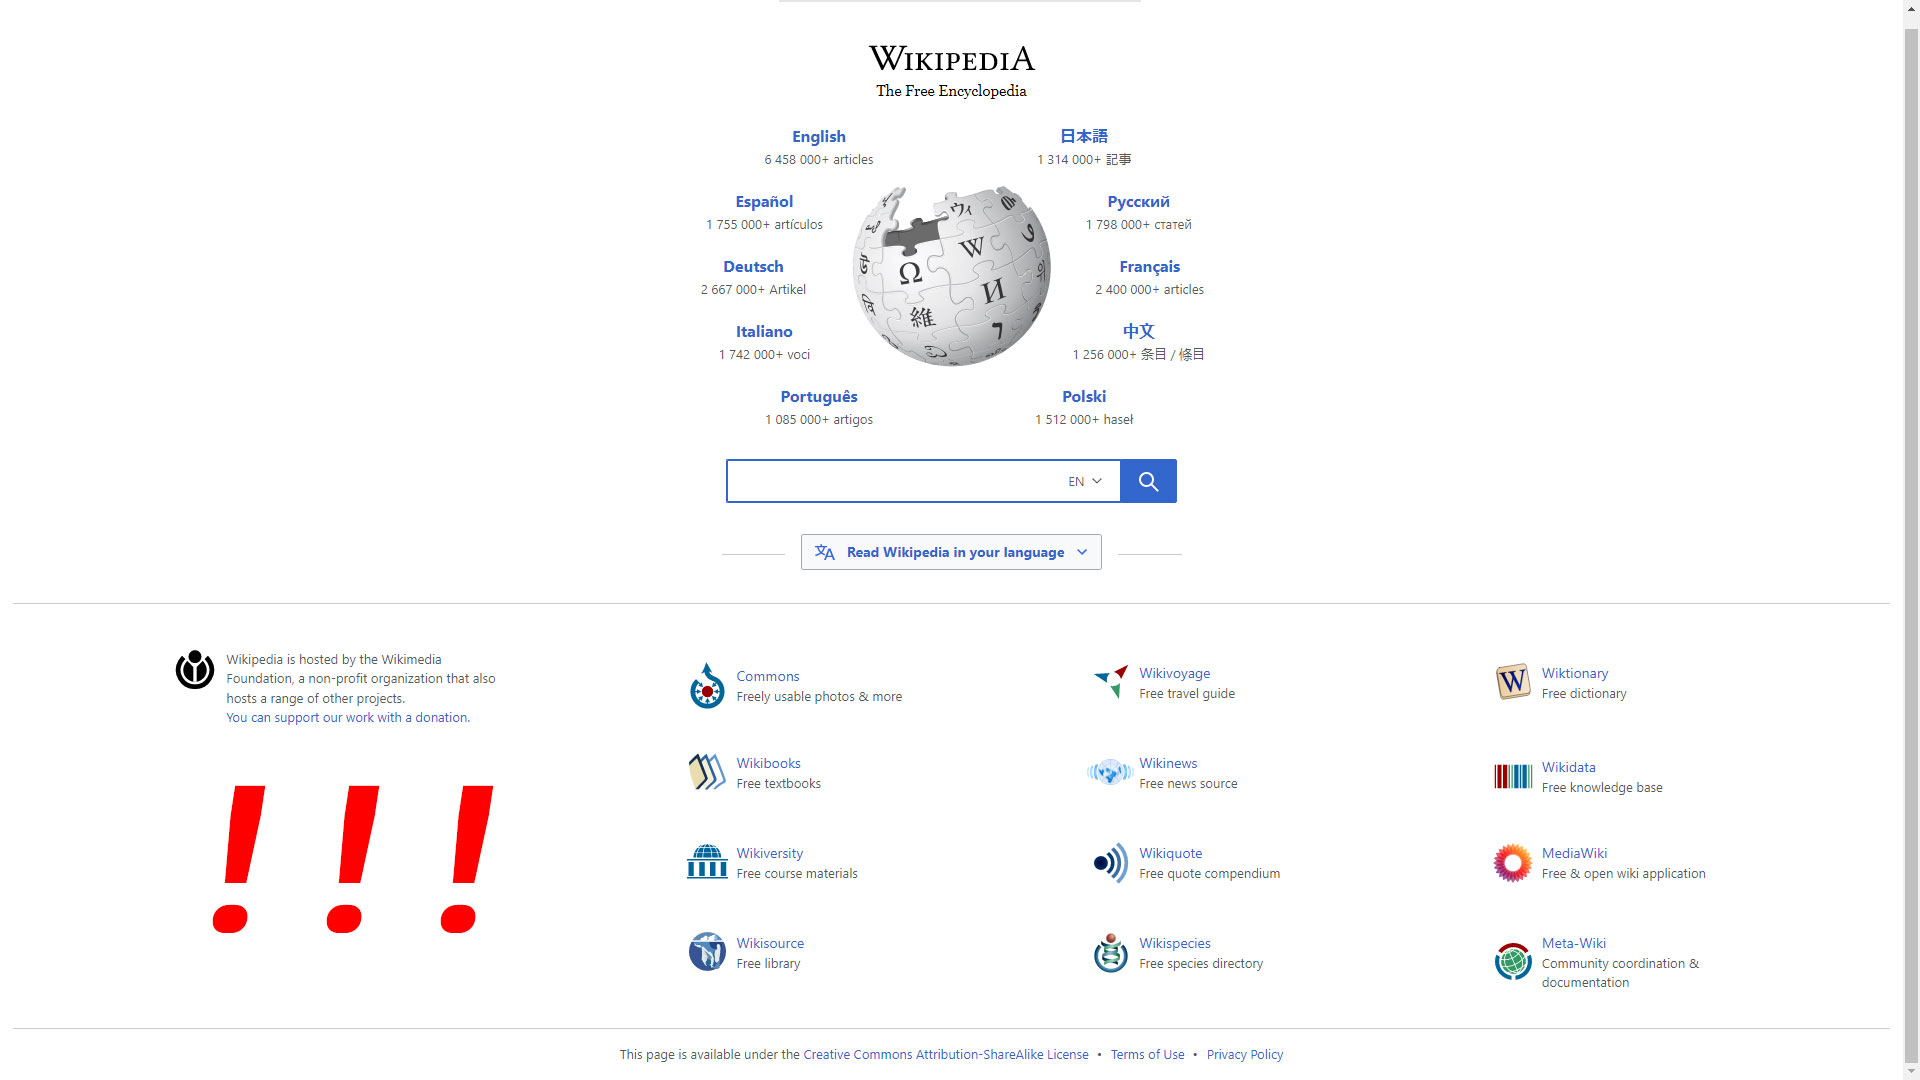
Click on the yellow-ish Save button at the top-right corner, go back to the previous tab ( in my case Wikipedia ), and refresh the page.
If all goes well, you should not see the item you meant to hide.
CSS Troubleshoot
On the off chance your style is not working, do one of the following:
- Double-check the class and id names, attributes, and hierarchy to make sure everything follows through
- Include additional classes and/or ids to be more specific than the original, default styles
- Add a space and an
!importantproperty in between none and the semicolon, e.g.display: none !important;
The second method is a gentler approach, whereas the third method is more of a “my house, my rules” mentality. Give the second method a shot before going all Oprah with !important properties.
And That’s It, You’re Done!
You can now apply custom CSS towards webpage content you cannot tolerate to look at anymore.
If you would like to learn more about CSS and what other styles you can add or remove to make your internet-surfing experience even better, visit W3Schools!
I hope you were able to learn something new! If you would like to know more about a certain web-development topic and want me to do a tutorial about it, shoot me a message and let’s make it happen.